Split String into Columns
Requirement:
The DB table contains a column with string data, which we wish to split into different columns and use these columns in our .jrxml report creation. For example, say, one of our DB tables has a column named item_summary which contains the summary of items in the format say:
Main Product - Sub_product - Units Required - Vendor Name, like:
Wheeler-Irvin Machiner - 2700 units - Sarah
Since our DB table has only one column with the data in the above format, we wish to divide this data into multiple columns, like Main Product, Sub-product, Units Required, and Vendor Name and use these columns in our .jrxml report creation instead of just one column item_summary so as to have easy readability when previewing the report.
Solution:
To achieve this requirement, follow below steps:
1. First, download the resultset from the DB client in a .csv file.
2. Open this downloaded file, and just keep the values of the column and remove the column name. Save the file.
3. Now, open Jaspersoft Studio and create a new CSV data source. When creating this CSV data source, use the CSV file from the above step. For CSV data sources, we have an option to select a field separator and with this, we can select to define how our column gets separated, like comma, tab, space, semicolon, etc. (For our above example, we can define this separator as a hyphen -). For information on creating CSV data sources, see “Using CSV Data Sources” section from our Studio guide:
https://community.jaspersoft.com/documentation/tibco-jaspersoft-studio-user-guide/v790/using-csv-data-sources
4. Once the CSV data adapter is created, create a new blank .jrxml report.
5. Then, open the ‘Dataset and Query Dialog’. Select the CSV data adapter created in the above steps from the drop-down menu, and then click on ‘Read Fields’. Click ‘Ok’
6. Now, we should be able to see the ‘Fields’ in the ‘Outline’ view. Drag the fields into the ‘Detail’ band. Then, rename the column names as required by selecting each column under the ‘Column Header’ from the ‘Outline’ view and renaming it under the ‘Static Text’ tab from the ‘Properties’.
7. Save the report and then preview it.
Publishing the report and the CSV data adapter to JasperReports Server
To have the report use this CSV data adapter as default when rendering the report on server, follow below steps:
1. Log in to JasperReports Server and go to the repository path where we wish to upload this data adapter. Right-click this folder > Add Resource > File > XML. Then select the .xml CSV data adapter file from the Jaspersoft Workspace directory and finally click on ‘Submit’. The CSV data adapter is now uploaded to the server.
2. Next, we will have to define this repository path of the data adapter as default data adapter for the .jrxml report inside Studio. To do this, open the report in Studio. Select the report name from the ‘Outline’ view which will be the top node.
3. Now, click on the 3-dot button of the ‘Default Data Adapter’ option under the ‘Properties’ view, and define the repository path of the uploaded data adapter.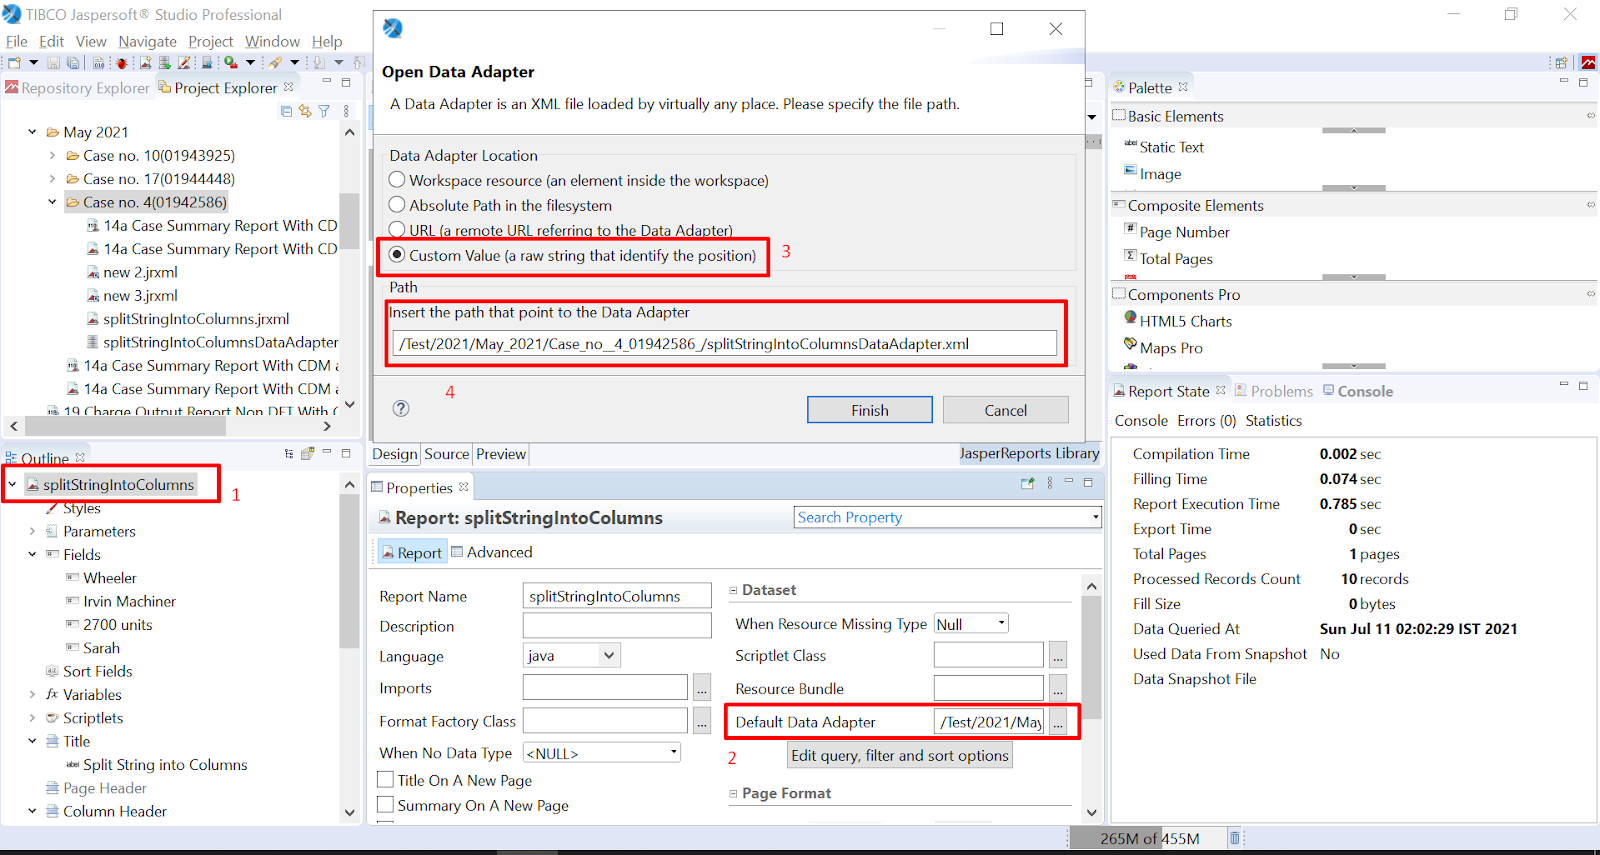
4. Save the report and then publish it.
5. While publishing the report, select ‘Don’t use any Data Source’ radio button. We don't need to specify any data source for this report unit as the data adapter property we set previously in the .jrxml report template itself is enough to connect our report to the uploaded data adapter. 
A sample splitStringIntoColumns.jrxml report and its CSV adapter, splitStringIntoColumnsDataAdapter.xml, can be found in the attachments section of this article.
-
Split String into Columns

-
Features: Reports
Product: Jaspersoft® Studio
Table of contents
User Feedback
Recommended Comments
There are no comments to display.
Create an account or sign in to comment
You need to be a member in order to leave a comment
Create an account
Sign up for a new account in our community. It's easy!
Register a new accountSign in
Already have an account? Sign in here.
Sign In Now